Introducción a Redux con React

El propósito de este artículo es explicar cómo estructurar una aplicación básica de React en conjunto con Redux, explicando también algunos conceptos teóricos elementales.

Cabe destacar que este artículo no incorpora la herramienta Redux Toolkit. Esto será explicado en un artículo siguiente pero vamos a adelantar que Readux Toolkit representa una forma mejorada y simplificada de trabajar. De cualquier modo, creemos importante conocer primero cómo es la forma clásica.

Para facilitar la comprensión, este artículo utiliza nombres en español en variables e identificadores en general creados por nosotros. Hace un tiempo encontré que esta diferenciación ayuda bastante a comprender y separar lo que es parte del lenguaje o framework de algo que estamos creando como desarrolladores.

Principios de Redux

Empezaremos mencionando que Redux es una librería independiente de React. Se puede utilizar en forma totalmente separada. En este caso vamos a ver la forma de utilizarla en una aplicación React.

Redux es un framework de JavaScript cuya función es permitir compartir variables de estado de una forma global a nuestra aplicación.

Por el contrario, con React se mantienen estados independientes en cada componente y, si es necesario pasar información de estado de un componente a otro, tenemos que duplicarla.

La forma de funcionar de Redux está basada en tres elementos básicos: actions, stores y reducers. Voy a explicar brevemente cada uno a continuación:

Estado inicial

Antes que nada, nuestra aplicación debe definir su estado inicial. Supongamos que nuestra aplicación representa a una manzana. El estado inicial podría ser algo así:

const manzanaInicial = {
  color: 'roja',
  sucia: true,
  bocadosRestantes: 5
};

Actions

Las acciones son la forma que tiene nuestra aplicación de comunicarse con Redux. Básicamente, las acciones son objetos con una propiedad type requerida, la cual indica el nombre de la acción a realizar.

Si se requieren enviar datos adicionales, normalmente se envían en un objeto payload, aunque puede tener cualquier nombre o bien, se pueden enviar como propiedades adicionales del objeto action.

El envío de las acciones a los reducers se realiza mediante la función dispatch del store. El dispatch recibe un único argumente, que es la action. En función del type de la acción, el reducer realizará los cambios al estado que sean necesarios.

Más adelante veremos también el concepto de “action creators”. Estos no son otra cosa que “wrappers” para las llamadas al dispatch cuando se necesitan realizar operaciones un poco más complejas en las que interviene otro elemento llamado middleware.

De esta forma, en lugar de hacer un dispatch({ type: “cargarDatos”}) tal vez estemos llamando a una función cargarDatos() que dentro tendrá una llamada a una función asincrónica y luego llamará al dispatch con los datos obtenidos: dispatch({ type: “cargarDatos”, payload: datos}).

Siguiendo con nuestro ejemplo de la manzana, las posibles acciones que podríamos realizar sobre ella podrían ser:

const LAVAR = { type: 'LAVAR' };
const COMER = { type: 'COMER', bocados: 2 };
const PODRIR = { type: 'PODRIR' };

Reducers

Son funciones que realizan cambios en el estado de acuerdo a la acción recibida. Por consiguiente, son funciones que reciben un estado inicial y un objeto action. El objeto action tiene siempre una propiedad type y luego puede contener datos adicionales. El reducer es el único que puede cambiar el estado, ya que no se puede acceder al store de otra forma.

Un ejemplo de función reducer para nuestra manzana podría ser el siguiente:

function manzanaReducer(state = manzanaInicial, action) {
  switch(action.type) {
    case 'LAVAR':
      // mantiene todos los estados y cambia el campo sucia a falso
      return { ...state, sucia: false };

    case 'COMER':
      // decrementa el número de bocados
      return {
        ...state,
        bocadosRestantes: Math.max(0, state.bocadosRestantes - action.bocados)
      };

    case 'PODRIR':
      // cambia el color a marrón
      return { ...state, color: 'marrón' };

    // no sabemos cómo tratar otras acciones así que solo devolvemos el estado actual
    default:
      return state;
  }
}

En el argumento del switch también podríamos utilizar simplemente action y utilizar las constantes que definimos en lugar de los strings. De esta forma evitaríamos errores al tipear mal los strings.

Store

El store es el lugar donde nuestra aplicación guardará el estado. Lo más recomendable es tener un único store por aplicación. La creación se realiza mediante la función createStore la cual recibe como primer argumento los reducers que vamos a utilizar y como segundo argumento, el estado inicial. Opcionalmente se puede definir un middleware y enviarlo como tercer argumento (luego explicaremos la función del middleware).

En nuestro ejemplo, podemos crear el store de la siguiente forma:

const miStore = Redux.createStore(manzanaReducer, manzanaInicial);

Una vez que tenemos esta configuración básica, podemos hacer el dispatch de acciones e ir cambiando por los diferentes estados.

Supongamos que lavamos la manzana. Esto equivale a hacer:

miStore.dispatch(LAVAR);

Si hacemos un console.log(store.getState()) antes y después del dispatch obtendremos lo siguiente:

{ color: 'roja', sucia: true, bocadosRestantes: 5 } // antes
{ color: 'roja', sucia: false, bocadosRestantes: 5 } // después

El ejemplo completo

Para probar el ejemplo completo que planteamos aquí, pueden crear un nuevo archivo llamado index.js (o cualquier nombre) en Visual Studio Code y copiar el código completo a continuación:

index.js

const Redux = require('redux'); // Aquí utilizamos require porque no estamos trabajando con un módulo

// DEFINIMOS NUESTRA MANZANA INICIAL (ESTADO INICIAL):
const manzanaInicial = {
    color: 'roja',
    sucia: true,
    bocadosRestantes: 5
  };

// DEFINIMOS NUESTRAS POSIBLES ACCIONES:
const LAVAR = { type: 'LAVAR' };
const COMER = { type: 'COMER', bocados: 2 };
const PODRIR = { type: 'PODRIR' };

// CREAMOS LA FUNCIÓN QUE UTILIZAREMOS COMO REDUCER
function manzanaReducer(state = manzanaInicial, action) {
    switch(action) {
      case LAVAR:
        // mantiene todos los estados y cambia el campo sucia a falso
        return { ...state, sucia: false };
  
      case COMER:
        // decrementa el número de bocados
        return {
          ...state,
          bocadosRestantes: Math.max(0, state.bocadosRestantes - action.bocados)
        };
  
      case PODRIR:
        // cambia el color a marrón
        return { ...state, color: 'marrón', bocadosRestantes: 0 };
  
      // no sabemos cómo tratar otras acciones así que solo devolvemos el estado actual
      default:
        return state;
    }
}

// CREAMOS NUESTRO STORE
// Le indicamos qué reducer (o reducers) debe utilizar y cuál es el 
// estado inicial de nuestra aplicación
const miStore = Redux.createStore(manzanaReducer, manzanaInicial);

// Mostramos el estado inicial antes de enviar algún dispatch
console.log(miStore.getState());

miStore.dispatch(LAVAR);
console.log(miStore.getState());

miStore.dispatch(COMER);
console.log(miStore.getState());

miStore.dispatch(PODRIR);
console.log(miStore.getState());

Luego, abrimos una terminal dentro del mismo Visual Studio Code yendo a Terminal/New Terminal.

En la terminal ejecutamos nuestro script con node de la siguiente forma:

node index.js

El resultado será el siguiente:

{ color: 'roja', sucia: true, bocadosRestantes: 5 }
{ color: 'roja', sucia: false, bocadosRestantes: 5 }
{ color: 'roja', sucia: false, bocadosRestantes: 3 }
{ color: 'marrón', sucia: false, bocadosRestantes: 0 }

Hasta aquí hemos visto solamente los conceptos básicos de Redux sin siquiera haber utilizado nada de React. A continuación vamos a ver cómo utilizarlo ya integrado en una React App.

Ejemplo inspirado en: https://dev.to/hemanth/explain-redux-like-im-five.

Agregando Redux a React

El objetivo de este artículo es explicar cómo incorporar Redux a una aplicación React de una forma más o menos básica y reutilizable.

Como vimos antes, podemos tener una aplicación totalmente funcional que usa Redux en un solo archivo. Del mismo modo también podríamos incorporar componentes de React varios en el mismo archivo.

Sin embargo, queremos presentar una forma de trabajar más organizada para que nuestras aplicaciones sean más fáciles de mantener.

Vamos a considerar el desarrollo de una app muy simple que mostrará una lista de usuarios, los cuales los vamos a obtener de https://jsonplaceholder.typicode.com/users.

Empecemos con la instalación de los paquetes redux y react-redux con npm:

npm install redux react-redux

Crearemos una aplicación simple en React:

npx create-react-app redux-blog

Por el momento vamos a crear un componente muy básico de React que listará los usuarios de la forma clásica y luego lo modificaremos.

Creemos entonces una carpeta components. Movamos el archivo App.js dentro de esta carpeta para mantener todos los componentes organizados ahí dentro. Si estamos trabajando con Visual Studio Code, nos preguntará si queremos actualizar los imports automáticamente. Si no, deberemos corregir el import a App en el archivo src/index.js.

Si ya habíamos ejecutado npm run build deberemos reiniciarlo luego de este cambio.

Creación del componente Usuarios

Seguidamente creamos la carpeta usuarios dentro de components y dentro, el archivo index.js que contendrá nuestro componente.

Para la llamada “clásica”, necesitaremos instalar axios. Esta es una herramienta que nos servirá para realizar llamadas a web apis:

npm install axios

Nuestro componente “clásico” quedaría así:

Archivo src/components/usuarios/index.js

import React, {Component} from 'react';
import axios from 'axios';

class Usuarios extends Component {

    state = { usuarios: [] };

	async componentDidMount() {
		const respuesta = await axios.get('https://jsonplaceholder.typicode.com/users');
        this.setState({usuarios: respuesta.data});
	}

	render() {
		return (
			<ul>
				{this.state.usuarios.map((usuario) => (
                    <li>{usuario.name} ({usuario.email})</li>
                ))}
			</ul>
		);
	}
};

export default Usuarios;

Con esto ya deberíamos poder visualizar la lista de usuarios y sus emails en el navegador:

Imagen mostrando el listado de usuarios obtenidos de la url json placeholder, funcionando en el navegador, con url localhost:3000.

Esta sería una aplicación React extremadamente sencilla. El único estado que tiene esta aplicación es el array de usuarios obtenidos. Tampoco es una aplicación que justifique el uso de Redux, pero lo vamos a aplicar para aprenderlo.

Action Creators

En primer lugar crearemos una carpeta src/actions. En esta carpeta crearemos los archivos de acuerdo a funcionalidades similares. Por ejemplo, AuthenticationActions.js, contendría signInAction() o logoutAction. Un archivo BlogActions.js contendría acciones tales como getBlogPostActionI(), deleteComment() o updateBlogPostAction().

Archivo src/actions/usuariosActions.js

import axios from 'axios';

export const traerTodos = () => async (dispatch) => {
  const respuesta = await axios.get('https://jsonplaceholder.typicode.com/users');
  dispatch({
    type: 'traer_usuarios',
    payload: respuesta.data
  })
};

En este ejemplo estamos definiendo la acción traerTodos. Al igual que todas las acciones, esta es una función que devuelve otra función. En este caso, la función devuelta por traerTodos está marcada como asincrónica (async) porque dentro tenemos una llamada a otra función asincrónica (indicada con await), axios.get().

Es importante destacar que podemos utilizar traerTodos como una acción porque vamos a utilizar el middleware Redux Thunk. De lo contrario, las acciones deberían ser objetos planos como lo es el argumento del dispatch.

Una vez que tenemos el resultado del axios.get() en la constante respuesta, llamamos al dispatch y le enviamos el tipo de acción a llamar (traer_usuarios) y el payload, que es respuesta.data.

Hay que tener en cuenta que, según la teoría de Redux, la acción propiamente dicha es lo que estamos enviando como argumento del dispatch. Con esta función traer_todos que creamos estamos “wrappeando” la llamada al dispatch para agregar algo de funcionalidad adicional.

Reducers

Crearemos una carpeta src/reducers y dentro, nuestro primer reducer:

Archivo: src/reducers/usuariosReducer.js:

const INITIAL_STATE = {
	usuarios: [] // el estado inicial es un array vacío llamado usuarios
};

export default function UsuariosReducer(state = INITIAL_STATE, action){
	switch (action.type) {
		case 'traer_usuarios':
			return { ...state, usuarios: action.payload };

		default: return state;
	};
};

Como nuestra aplicación puede contener varios reducers, vamos a crear un “índice” y a combinarlos a todos en una única variable.

En la misma carpeta crearemos un archivo index.js. Este archivo nos servirá para la combinación que mencionamos. Para poder hacer esto primero tenemos que importar la función combineReducers.

Archivo: src/reducers/index.js

import { combineReducers } from 'redux';
import usuariosReducer from './usuariosReducer';

export default combineReducers({
	usuariosReducer
});

En este caso estamos utilizando un único reducer llamado usuariosReducer.

Configuración del Store

Ahora que ya tenemos nuestros reducers, podemos crear nuestro Store en nuestro src/index.js de la siguiente manera:

import misReducers from './reducers';

const store = createStore(
	misReducers, // Reducers
	{}, // Estado inicial
);

Aquí estamos importando el módulo que definimos en reducers/index.js (from ‘./reducers’) y, como es un export de tipo default podemos darle el nombre que queremos. En este caso lo llamamos misReducers.

Seguidamente, creamos nuestro único store al que llamaremos miStore. Para ello hacemos uso de la función createStore que recibe los reducers que utilizaremos y el estado inicial (algunos desarrolladores prefieren utilizar el createStore en el index.js dentro de una carpeta src/store).

Otro cambio que nos falta es el agregado del Provider para indicarle a nuestro App cuál será el store que utilizará nuestra aplicación. Así es como nos queda todo el index.js:

Archivo src/index.js

import React from 'react';
import ReactDOM from 'react-dom';
import './index.css';
import App from './components/App';

import { createStore } from 'redux';
import { Provider } from 'react-redux';

import misReducers from './reducers';

const miStore = createStore(
	misReducers, // Reducers
	{}, // Estado inicial
);

ReactDOM.render(
	<Provider store={ miStore }>
	  <App />
	</Provider>,
	document.getElementById('root')
);

Uso de Middleware

Un middleware, como Redux Thunk, nos permite interceptar un dispatch de Redux para devolver una función en lugar de un objeto action plano, que sería lo esperable. Esto es especialmente útil en el caso de llamadas asincrónicas. El middleware retrasa entonces el dispatch de la acción hasta que se completa una línea de código asincrónica. Más info: https://platzi.com/blog/como-funciona-redux-thunk/

Para comenzar, hay que realizar la instalación con:

npm install redux-thunk

En src/index.js falta añadir el middleware que nos permitirá realizar las llamadas async. Para esto hay que comenzar por importar reduxThunk desde ‘redux-thunk‘ y la función applyMiddleware de ‘redux‘:

import reduxThunk from 'redux-thunk';
import { createStore, applyMiddleware } from 'redux';

Vamos a aplicar el reduxThunk como middleware. Esto lo debemos especificar en la función createStore. Con estos cambios, nuestro index quedaría así:

Archivo src/index.js

import React from 'react';
import ReactDOM from 'react-dom';
import App from './components/App';
import misReducers from './reducers';
import { createStore, applyMiddleware } from 'redux';
import { Provider } from 'react-redux';
import reduxThunk from 'redux-thunk';


const miStore = createStore(
  misReducers,
  {},
  applyMiddleware(reduxThunk)
);

ReactDOM.render(
  <Provider store={miStore}>
    <App />
  </Provider>,
  document.getElementById('root')
);

Conexión a un componente

Para poder conectar nuestro componente con el reducer necesitamos importar la función connect de React-Redux:

import { connect } from 'react-redux';

También tendremos que importar las actions (las crearemos a continuación):

import * as usuariosActions from '../../actions/usuariosActions';

Ya que tengo esto ya puedo conectar mi componente. Al final de nuestro componente primero debemos definir la función mapStateToProps, la cual recibirá como parámetro todos los reducers y puedo devolver los reducers que necesito utilizar.

Una vez que tenemos esta función definida, se le pasa como primer parámetro a la función connect y, como segundo parámetro, todos los actions

const mapStateToProps = (misReducers) => {
  return misReducers.usuariosReducer;
};

export default connect(mapStateToProps, usuariosActions) (Usuarios);

Finalmente, nuestro componente ya podría llamar a la acción traerTodos en el componentDidMount. A continuación, el componente completo:

Archivo src/components/usuarios/index.js

import React, {Component} from 'react';
import { connect } from 'react-redux';
import * as usuariosActions from '../../actions/usuariosActions';

class Usuarios extends Component {

	async componentDidMount() {
		this.props.traerTodos();
	}

	render() {
        console.log(this.props);
		return (
			<ul>
				{this.props.usuarios.map((usuario) => (
                    <li>{usuario.name} ({usuario.email})</li>
                ))}
			</ul>
		);
	}
};

const mapStateToProps = (reducersRecibidos) => {
	return reducersRecibidos.usuariosReducer;
};

export default connect(mapStateToProps, usuariosActions)(Usuarios);

Si observan, acá hemos modificado el método componentDidMount. Ya no necesitamos hacer la petición aquí por medio de axios. Esto lo hacemos ahora llamando a la acción traerTodos().

Otras cosas que hemos modificado:

  • Quitamos el import axios.
  • Eliminamos la inicialización del state.
  • Ya no trabajamos más con la variable this.state.usuarios sino con this.props.usuarios, que nos la proporciona Redux.

Con estos cambios hemos logrado la configuración y el funcionamiento básico de nuestra aplicación con React y Redux.

Por supuesto que hay muchos pasos más y muchas formas diferentes de realizar esta misma acción, pero esto es tan solo el principio.

Resumen

Vamos a repasar brevemente lo que hicimos:

  1. Creamos la app de React con npx create-react-app {nombre-app}
  2. Creamos nuestras acciones en la carpeta src/actions.
  3. Creamos nuestros reducers en la carpeta src/reducers y los combinamos en el index.js.
  4. Creamos el Store en nuestro archivo src/index.js.
  5. En el mismo archivo configuramos el <Provider> y le asignamos el store a utilizar.
  6. En el mismo archivo configuramos el middleware, Redux Thunk.
  7. Por último, conectamos nuestro componente Usuarios, en components/usuarios/index.js con el reducer que queríamos usar.

Código fuente completo: https://github.com/changomarcelo/redux-blog
Definición de rutas con React Router

En una aplicación React se utilizan “rutas” para definir URLs que, a su vez, activarán ciertos componentes.

Lo habitual es que nuestra aplicación tendrá un componente principal, comunmente llamado App, y será aquí donde realizaremos la definición de las rutas y otras configuraciones como el layout.

Como pre-requisito para utilizar esta funcionalidad, debemos importar los componentes BrowserRouter, Switch y Route con la siguiente directiva:

import {BrowserRouter, Route, Switch} from 'react-router-dom';

La implementación se realiza dentro del componente función App (o sea, que no lleva render()):

function App() {
  return (
    <BrowserRouter>
      <Layout>
        <Switch>
          <Route exact path="/" component={Home} />
          <Route exact path="/posts" component={Posts} />
          <Route exact path="/posts/new" component={PostsNew} />
          <Route exact path="/posts/:postId/edit" component={PostsEdit} />
          <Route component={NotFound} />
        </Switch>
      </Layout>
    </BrowserRouter>
  );
}

En este ejemplo, tenemos 5 rutas. Las rutas son elegidas por React en base a un elemento Switch. Según la ruta que escribamos en el navegador, si encuentra una coincidencia exacta con la propiedad path, activará el component definido en la propiedad component.

Por ejemplo, si escribimos la ruta /posts/new en el navegador, se activará el componente PostsNew (obviamente, todos los componentes que se llaman aquí deben ser importados en el archivo JS).

Tenemos también un ejemplo con una ruta que recibe una variable postId. Esta variable se indica con dos puntos adelante. También tenemos el caso por descarte, si no encuentra ninguna de las rutas indicadas, mostrará el componente NotFound.

Nótese que el componente que se active estará inserto dentro del componente Layout. Este es un componente especial que se encarga de mostrar el diseño común para todas las páginas del sitio. El código completo del componente Layout podría ser algo así:

import React from 'react';

import MyNavbar from './MyNavbar';

function Layout(props) {
  return (
    <React.Fragment>
      <h1>Centraldev</h1>
      <MyNavbar />
      {props.children}
      <footer>&copy; 2021 Centraldev - All rights reserved</footer>
    </React.Fragment>
  );
}

export default Layout;

Igualmente, tengan en cuenta que esto, a su vez, irá dentro del div#app que normalmente encontramos en el archivo public/index.html:

<!DOCTYPE html>
<html lang="en">

<head>
  <meta charset="utf-8" />
  <meta name="viewport" content="width=device-width, initial-scale=1, shrink-to-fit=no" />
  <title>Mi página</title>
</head>

<body>
  <div id="app"><!-- aquí se inserta todo --></div>
</body>

</html>

¿Por qué es esto? Esto es porque en el archivo index.js (en src) tenemos lo siguiente:

const container = document.getElementById('app');
ReactDOM.render(<App />, container);

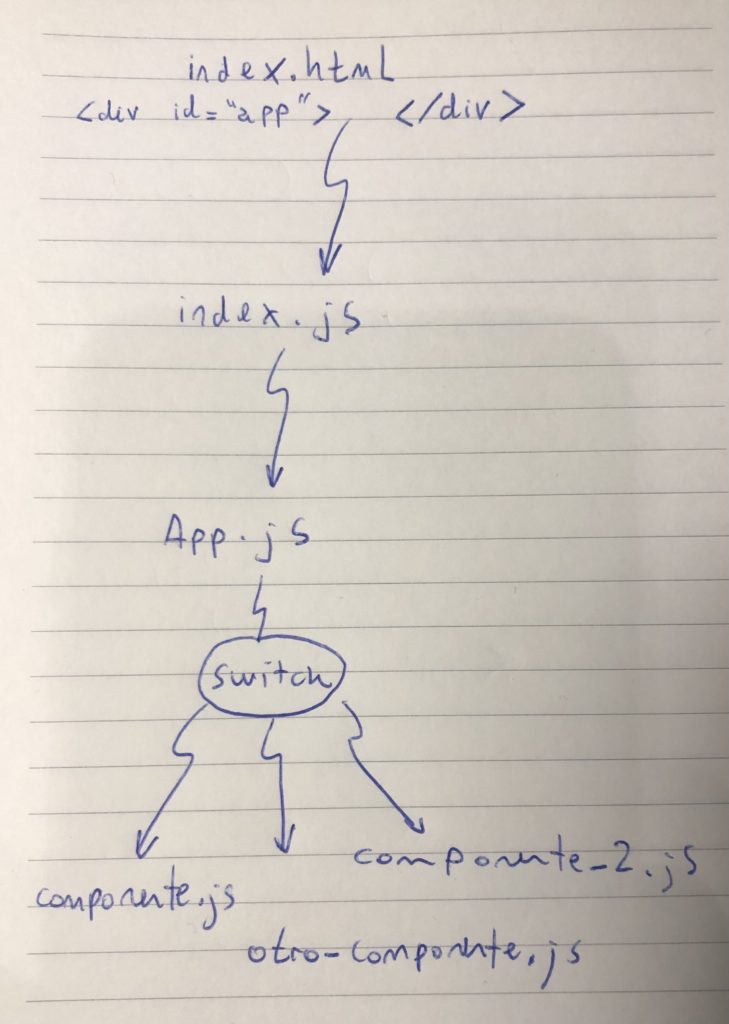
Este diagrama explica cómo se intercomunican los distintos archivos:

Archivos básicos en React.
React official website

Consumo de una API con React

Vamos a ver un ejemplo muy simple y básico de cómo proceder a implementar el consumo de una API REST desde React. Este artículo asume que ya se tienen algunos conocimientos básicos de React.

El primer paso consiste en inicializar las variables que necesitaremos para manejar los distintos estados de nuestro componente, para guardar los datos que recibimos de la API y el número de página.

Estas variables las crearemos como variables de estado pero antes vamos a inicializarlas con sus valores predeterminados:

state = {
    loading: true,
    error: null,
    data: {
      results:[]
    },
    nextPage: 1,
  };

Este código también puede ir en el constructor.

Los datos los vamos a solicitar a la API en el evento componentDidMount(), es decir, cuando el componente se ha insertado en el DOM. Para esto vamos a llamar a una función fetchData() que también crearemos:

componentDidMount(){
  this.fetchData();
}

fetchData = async () => {
  this.setState({ loading: true, error: null });

  try {
    const response = 
      await fetch(${url}?page=${nextPage});    const data await response.json();

    this.setState({
      data: { results: [].concat(this.state.data.results, data.results) },
      loading: false,
      nextPage: this.state.nextPage + 1
    });
  }
  catch(error){
    this.setState({loading: false, error: error});
  }
}

La función fetchData es asíncrona porque a su vez llama a métodos asíncronos, como es fetch. Por eso la debemos declarar con la palabra clave async.

En la función empezamos asignando el estado de loading en true ya que queremos indicar que estamos realizando la carga de datos desde la API. Luego utilizaremos esta variable para mostrar un mensaje de “loading” o también se puede emplear una animación. La variable de estado error la asignamos en null porque no tenemos ningún error de carga.

Dentro de un bloque try llamamos a la función fetch, la cual es asíncrona, por eso debemos llamarla con la palabra clave await. El método fetch es el que realiza la petición a la API y recibe, como argumento, la URL hacia donde debemos enviar la petición. El resultado de esta petición lo guardamos en la variable response.

Para obtener los datos a partir de la variable response llamamos a otra función asíncrona que es json().

Los datos obtenidos los guardaremos en la variable de estado data, mediante el método setState(). En nuestro ejemplo, el array con los resultados son un objeto results dentro de data.

Para ir sumando los datos que obtenemos en sucesivas paginaciones utilizamos el método concat() y vamos agregando estos resultados a this.state.data.results.

Render

El listado de los resultados es muy sencillo. Lo haremos en la función render(). Para esto utilizaremos map():

<ul>
  {this.state.data.results.map(character => (
    <li key={character.id}>{character.name}</li>
  ))}
</ul>

En el método render también vamos a mostrar el texto (o animación) para el estado “loading” y el mensaje de error, si existiese:

{this.state.loading && (
  <div>Loading...</div>
)}

if (this.state.error) {
  return (
  <div>An error has occurred: {this.state.error.message}</div>
)}

Por último, no debemos de olvidarnos del botón para cargar los resultados de las siguientes páginas. Este será un botón que solo se mostrará cuando this.state.loading sea false y llamará a la función fetchData() en su evento onClick:

{!this.state.loading && (
  <button onClick={() => this.fetchData()}>Load more</button>
)}

Consulta el tamaño de las tablas en SQL Server

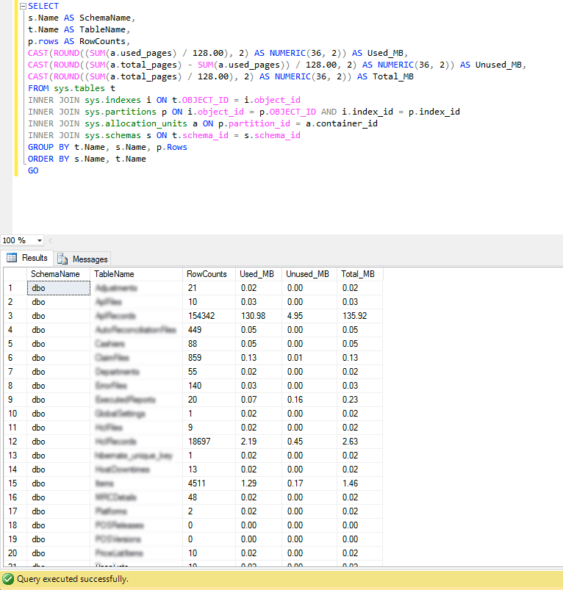
Cuando estamos analizando por qué una base de datos ocupa mucho espacio, una forma de investigarlo es visualizar el tamaño que ocupa cada tabla.

Esto puede obtenerse fácilmente con una consulta como esta:

USE [NombreBD] -- reemplazar nombre base de datos
GO
SELECT
s.Name AS SchemaName,
t.Name AS TableName,
p.rows AS RowCounts,
CAST(ROUND((SUM(a.used_pages) / 128.00), 2) AS NUMERIC(36, 2)) AS Used_MB,
CAST(ROUND((SUM(a.total_pages) - SUM(a.used_pages)) / 128.00, 2) AS NUMERIC(36, 2)) AS Unused_MB,
CAST(ROUND((SUM(a.total_pages) / 128.00), 2) AS NUMERIC(36, 2)) AS Total_MB
FROM sys.tables t
INNER JOIN sys.indexes i ON t.OBJECT_ID = i.object_id
INNER JOIN sys.partitions p ON i.object_id = p.OBJECT_ID AND i.index_id = p.index_id
INNER JOIN sys.allocation_units a ON p.partition_id = a.container_id
INNER JOIN sys.schemas s ON t.schema_id = s.schema_id
GROUP BY t.Name, s.Name, p.Rows
ORDER BY s.Name, t.Name
GO 


Tengamos en cuenta que las bases de datos de SQL Server Express solo pueden ocupar hasta 10 GB de espacio por lo tanto es importante monitorear este dato.

SQL Table Size Query

Cómo reducir el tamaño del archivo de Log de SQL Server

SI nuestro archivo de log es muy grande probablemente tengamos problemas con el espacio en el disco más pronto que tarde.

Si nuestra base de datos tiene muchas transacciones pero maneja poco volumen de datos, es común que tengamos un archivo de datos (.mdf) relativamente pequeño y un archivo de log bastante más grande (.ldf).

Una de las operaciones más comunes para achicar el tamaño del archivo de log es recurrir a la opción Tasks > Shrink > Files del SQL Server Management Studio.

En la lista File type escogeremos entonces Log y luego nos mostrará en Available free space cuanto espacio se puede liberar. Para ejecutar la operación, hacer click en OK.

Sin embargo, es posible que ejecutes la operación Shrink File pero el tamaño del log no se reduce.

En este caso hay una alternativa que podemos emplear en el caso de bases de datos que NO son de producción: Para esto hacemos click derecho sobre la base de datos y elegimos Properties y luego Options. En la opción Recovery Mode nos aseguramos que diga Simple (no Full). Luego procedemos a hacer el Shrink como explicamos arriba.

Alternativamente podemos ejecutarlo en Transact-SQL:

ALTER DATABASE mydatabase SET RECOVERY SIMPLE
DBCC SHRINKFILE (mydatabase_Log, 1)

Tengamos en cuenta que el Recovery Mode afecta la posibilidad de restaurar una base en el futuro ya que en los logs se guarda la información de todas las transacciones. Si queremos poder volver a restaurar la base a un estado pasado en el futuro, tenemos que asegurarnos de hacer una copia de seguridad del archivo de log.


About ticket titles

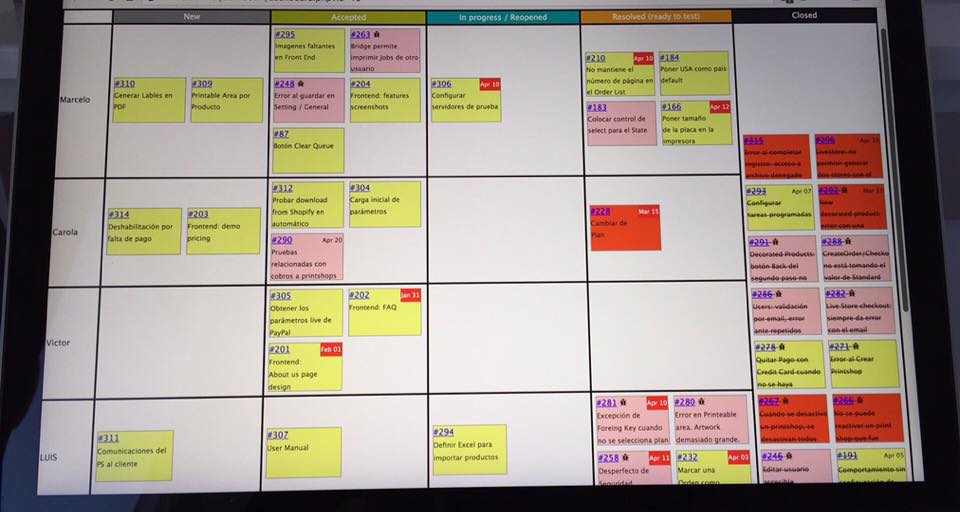
When you create new tickets in an issue/bug tracking system, always think twice about the titles you choose.

These titles give no clue of what the task is about. I have to inevitably open the ticket and read the description every time to remember what it was all about.

These titles could have been replaced with something like:

  • Print job missing error.
  • Chronological sequence & codes report.
  • Received codes report.

Now these titles provide more information. I don’t need to open the ticket to remember what the task was all about.

Buenos Aires

Outsourcing to Argentina – The Definitive Guide

Since 2002 Argentina has greatly evolved as a software development hub. The benefits of outsourcing to Argentina are similar as to other traditional offshore locations like India, Asia, México or East Europe.

Universities are Free.

UBA

In Argentina you will find a highly educated workforce. This is because education is totally free from kindergarten to university. There are many free universities and in the last 20 years many public universities have been created in the most important cities of the country. This allows for people whose parents hardly could end high school, to become university graduates.

According to data from 2014, 4.5% of population attends to university and 3.5% is in public universities.

The most important university in Argentina is University of Buenos Aires (UBA). It ranks #4 as the most prestigious institutions in Latin America and 75 in the QS world ranking.

But there are other important universities in almost every big city in the country; many have been created in the last 20 years.

There are other universities specialized in tech areas like the one where I studied. This is the case of Universidad Tecnológica Nacional (UTN). This university specializes in technology areas like electronics, computer science and systems among others.

Of course there are private universities like Universidad Austral, Universidad Católica or ITBA and specialized institutions that they teach short careers, all with very good level. The number of students in private universities is growing at an average rate of 3.3% each year.

Competitive costs

buildings in Buenos Aires photo

Argentina is not the cheapest offshore location, but you will still find very competitive costs. The costs of living (renting and food) are significantly lower than other big cities in the world. The relation between quality and price will be very good.

For example, you can find freelance developers in Buenos Aires starting at 2500 USD per month. You can still find cheaper, but less experienced.

Costs in other cities could be even more competitive. For example, cities far from Buenos Aires, specially in the North of the country have all very good universities and produce very good professionals.

However, most of the tech companies only seem to look at Buenos Aires, Córdoba and Rosario, leaving a lot of talent undiscovered.

Some cities you should have in your radar are Salta, San Salvador de Jujuy, Resistencia, Corrientes, Posadas or Tucumán. All in very competitive areas and all served with very good universities.

There many many others, but these cities are among the ones who hasn’t been fully discovered yet as excellent tech hubs although they have everything needed to make it happen.

Moreover, many students from cities where there is no University

English

english learning

Argentina has the highest level of english proficiency in Latin America and ranks #19 in the world, according the the EF English Proficiency Index.

Argentina English Proficiency English

Apart from English, other languages are very popular in Argentina. There are very good institutions to study italian, french, portuguese and german, among the most populars.

Culture and Environment

café tortoni

Argentina is a mix of cultures. The country was colonized by Spain in the year 1536. Since then, a lot of immigrants have settled in this country mainly from Spain, Italy, Portugal, France, Germany and many from neighbour countries as well, among others.

Buenos Aires, its capital city is also often recognized as the Paris from South America. Stunning architecture, cosmopolitan atmosphere, the latest fashions and trends and intimate side walk cafes make the biggest city in the country a magnet for travellers as well.

Argentina has other environmental and safety advantages: it is far from war or military conflict zones, extreme natural events like tornados, hurricanes or earthquakes are very uncommon and it is not a target for terrorism.

Discussions and Ideas

If dealing with an offshore service provider you  only hear “yes, sir”, that’s not going to be the most common case when dealing with an argentinean.

Argentineans are passionate and love to have their opinions and suggestions considered. They are more self confident and honest. Unlike other offshore providers, an argentinean will also say “no” when it’s no.

If your current developer always says “yes” and then he is apologizing all the time, you will notice the difference with an argentinean.

Argentineans love to get involved in the planning and discovery process when defining your projects or the features for your project. Argentineans will probably argue with you and propose you different ways of doing things. I strongly believe that’s a characteristic you will always want to find in any kind of worker.

If your developer, from wherever she or he is, doesn’t appear to be like this, it doesn’t mean he will not be good, but you will have to hire someone else to supervise or to help you define your requirements before assigning the work.

If you have any other topic you would like to know about outsourcing to Argentina, please leave a comment below or write to marcelo@centraldev.com.ar.


Nissan

The Production System we built for Nissan Mexicana

If I have to choose the most interesting project in which I have ever worked, this is it.

Everything started in 2007, with the inquire of a customer with whom we had been working for many years already. This client was based in Texas and he had received a request for proposal from Nissan Mexicana for a system called Broadcast Codes Administrator. The system was for the plant that Nissan has in Aguascalientes, Mexico.

The purpose of the system was to allow the Specifications Department to administer the Part Codes sent to the production line, each time a car entering in the trim shop.

Their old system only allowed 60 parts per vehicle. We increased that capacity to 2000 codes in 2008 and then to 4000 in 2013.

Aparte, we added the capacity to substitute parts, a process that was very hard to do with the previous system and that caused a lot of delays in the production line.

The discovery process

nissan production

Our customer travelled to Buenos Aires and he stayed for 1 week in the city. We met with him every day of that week analyzing the RFP and the project.

We created diagrams to validate our understanding and we documented everything. We had a few calls with Nissan to clarify very technical concepts and very specific to their business operation.

At the end of this intense work week we had a quite well defined Software Requirements Specification document. We suggested we could build a prototype for my client to present at Nissan the following month, in the opportunity of a business trip.

We created a quick prototype and obtained very valuable feedback from that. With that information we created new documentation requested by Nissan, a more detailed Requirements document and a Software Design document.

During that time we also started the development of some areas of the project that were well defined.

I also travelled to Mexico for one week after that to present all the documentation we had created. We met with all the involved  personnel there almost all day during one week. I presented the project and the proposed design and I received valuable feedback. We also planned how the installation and migration of their previous system was going to be.

After that trip, I get back to Buenos Aires to finish the project. It was a month of hard work but we have a tight deadline.

I travelled again to Mexico, this time to perform the final installation, training and support. It was almost 4 weeks there and this time I travelled with another of my developers.

working in nissan plant

After the successful launch of the system, in March 2008, we continued supporting the plant, and we released a whole new version in 2011 and another in 2013.

In 2011 we installed the same system at another Nissan plant in México, Cuernavaca, and in 2013 we installed it at the second plant in Aguascalientes.

Requirements

The Broadcast Codes Administrator system was required in order to increase the number of parts that the current systems at the plant were able to manage.
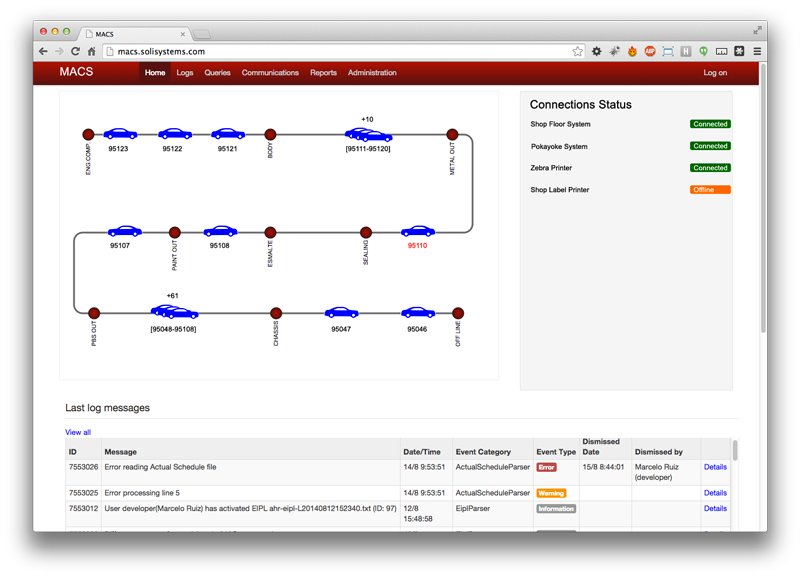
At the time we received the requirement, the existent legacy systems at the plant were able to manage only 60 part codes per vehicle.

The plant had the need to increase these value but also have the ability to perform changes in real time to the codes that were configured from the corporate office, in order to replace parts that are equivalent or to make requested changes to the vehicles configuration.

The system also needed to know what parts each vehicle have by default. This information varies every day, according to the corporate office information. So it was needed to automate the input of this information in the system.

The most important part of the system was the communications module which had to receive the realtime information of the vehicles in the different points of the plant, perform the replacement of the codes and then broadcast this information to the other various systems and printers.

It was also important to log all the information that wen through the system, from vehicles information, to parts used in each vehicle, and actions of the users like who made each change, who dismissed an alert or who activated the data files each date.

Solution

bca system

In order to automate the input of the information for the planned production for each day, the vehicles specifications and the parts for each one, we developed various Windows services that detect when the new files for each day production are copied to a special folder, from the corporate office. This information is read from the files and stored in a database with the proper normalization.

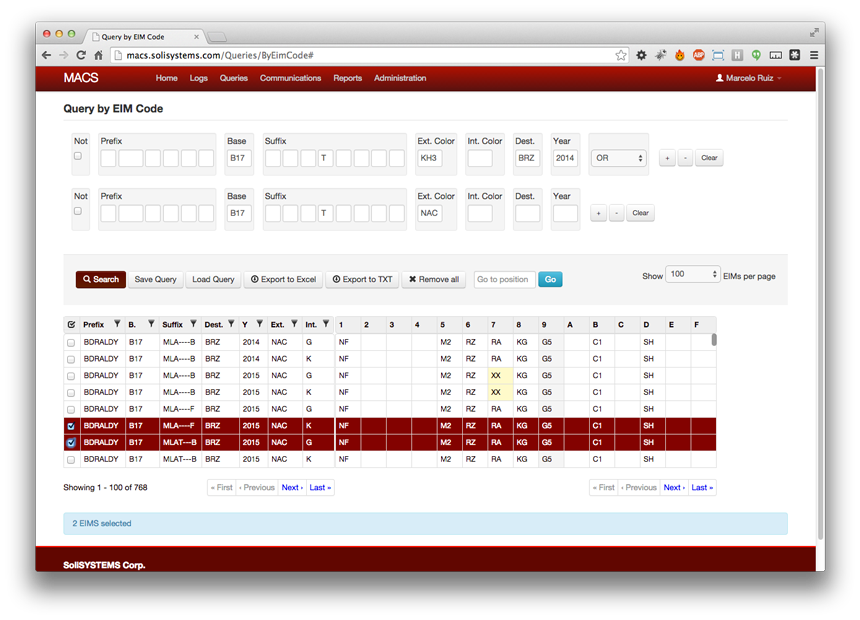
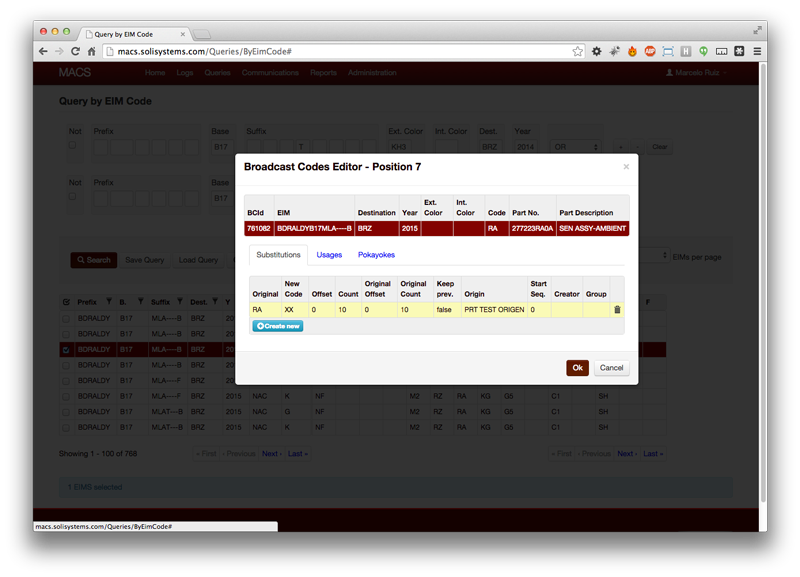
The administration of this information is made with a web application called MACS WEB. This application allows users to review the data received for the vehicles, perform all types of queries and make changes to the part codes, if necessary.

Broadcast Codes Administrator

For example, the users can search for a specific set of vehicles that share certain features, by color, position of the driving wheel, transmission type, etc. and apply the changes only to that set of vehicles.

The changes then can be programmed to be applied for a certain number of vehicles in the line, leaving an offset at the beginning and even serialize any number of changes one after the other.The query screen also allows filtering by the detail and export the data found.

This application also allows the users to perform administrative tasks and configuration.

The most important part of the system is the communications module. This is also a Windows service. The communications module is in charge of the reception of the information of each vehicle as it passes through the different achievement points in the plant. This module then communicates with a MACS web service in order to obtain the correct parts for the vehicle. With this information, the MACS constructs a new message, and sends it to the other systems in the plant, according to how it was programmed.

Installation

installationCentraldev also helped actively in the installation and startup of this and other systems in the car plant, in Mexico.
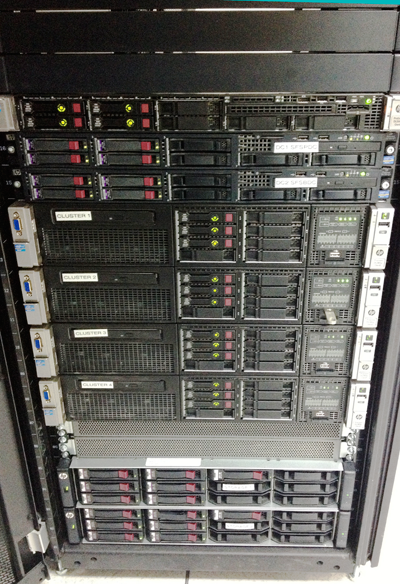
Task performed during the installation included:

  • Installation of the systems developed by us.
  • Configuration of the systems under Windows 2013 Failover Manager.
  • Configuration of the system under Network Load Balancing under WIndows 2013.
  • Technical support during the startup of the system and during the first weeks of use in site.
  • Monitoring of the system and server performance.
  • Training the plant personal.
  • Changes and corrections until the acceptance.

Technologies used

This project makes use of various technologies: C#, ASP.NET MVC, .NET Framework, JavaScript, jQuery, BootStrap, WCF, SQL Server 2012, and more.

servers

The result

Since the MACS resulted so easy and flexible to manage, it soon became a very important tool of the day to day operations of the plant. The system was designed in order to make it easy for other systems to integrate to it and consume the data it manages and at this time, the information that the MACS generates is shared by four other systems at the plant.

From 60 parts that the old system could manage at the beginning, the new system is now able to manage 4000 parts and also allows changes and historical records, among more than 50 new features.

bca result

Jujuy

Argentina’s full potential is still undiscovered

Thousands of tech students from small cities in Argentina spend several years attending to an University far from their home.

When they graduate, many want to return to the quiet life of their home towns only to find there are no tech jobs there.

Some succeed with small entrepreneurship or working remotely for some company in Buenos Aires or offshore.

These professionals have all great skills, good english level and they are willing to contribute to interesting projects with very competitive costs. This talent is under the radar and still needs to be discovered.

Since 2010 I decided myself that I would give priority to these professionals and I made many trips to cities around the country meeting them and discovering these people.

I’ve been in Resistencia, Santa Fe and Jujuy, And I met in Buenos Aires with people from Bahia Blanca, Mar del Plata and La Pampa, among other places, where I met incredible professionals. Some of them continue working with me while others have made their way to better jobs.

I’m proud to know that people who started working for me is now working in important companies in the United Kingdom, Netherlands or USA.

I still work to discover more of these talent every day.

Working with remote teams – The definitive guide

As a digital services provider I have been in both sides of the equation. I’ve hired remote and distributed teams and I have been hired to work remotely for clients of all over the world.

Remote work can definitely work and give you many benefits, but you have to clearly understand how to do it right. It is a process that involves discipline and good communications skills.

So, if you are considering to engage with a remote team or individual, this tips are for you.


1. Define your Process

ticket system

You don’t just outsource your project and expect the company or freelancer figures out everything. Either you or the company you hire must have a well defined scope and process to work towards your goal.

If you are hiring a company or an existent team, it is more likely they will already have a process in place. If you hire freelancers or building your remote team from scratch, you will have to spend a lot of time developing and refining the right process.

In any case, experienced professionals will have some experience in popular software development processes. Scrum or some sort of an agile methodology are good choices to start with. It’s a warning sign if the company doesn’t propose you any process or if they simply tell you they will adapt to whatever you want.

A process should define, at least:

  • Meetings: when and how meetings are held. What topics are treated.
  • Communication: how will you communicate and how often.
  • Responsibilities: clear definition of the responsibilities of each team member.
  • Workflow: how work will evolve through different stages from idea to done.
  • Tools: what tools will be used for remote work collaboration, share documentation, work assignments, bug tracking, etc..
  • Billing and Payments: how and how often will you pay to your remote providers.


2. Scope

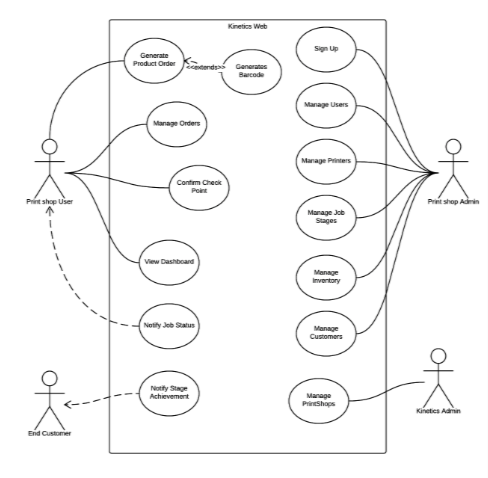
Use case diagram

As in the previous case, you don’t just throw features to the company or freelancer and expect them to do it right.

If you work with an experienced team, they will probably help you define the scope. But some freelancers are just order takers. They will do exactly what you tell them but don’t expect more; they won’t read your mind.

I have learnt over the years of experience that the most important part of the development happens before the first line of code is written. That’s when a feature is defined with as much detail as needed, user interfaces are designed and everything is documented clearly for your programmers. You just need the right professional for each task.

Another sign of concern is with freelancers who just say “yes” to everything. A professional who never questions your decisions, proposes alternatives or better way to do things is probably not being professional. Go for the freelancers who can say “no” when appropriate. However, pay attention if their suggestions are merely to bill more hours.


3. Time zone and proximity

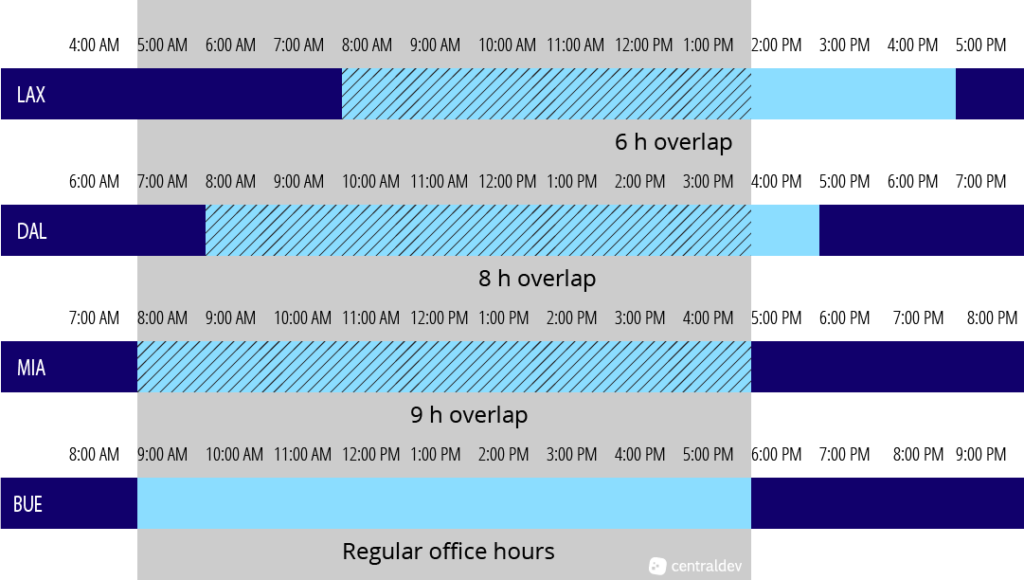
time zone overlapping

We use the term “nearshore” to refer to a provider that is close to our location both in distance and time zone.

Always consider to hire a team that can overlap with your time zone a minimum of four hours a day. If there is a bigger difference you’ll lose momentum and any blocking issue or question you have after your team ends their work day will have to wait until the next day to be attended. And when you start your day and see their response they will be less 3 hours or less until they leave again? No good outcome can come from this.

So, if you are based in the West Coast, the East most you should go is GMT -3 (Argentina, Brazil and Uruguay). If you start to work at 8 am, that will be 12 pm in Buenos Aires, where we typically work until 6 pm. That give you 6 hours of overlapping during DST or 5 during the rest of the year (Argentina and Uruguay don’t observe DST).

Proximity and connectivity is also a factor to consider. If you ever have to travel to meet your team, or your team has to travel, is good to have good connectivity and reach the destination with no more than one flight connection and no more than 4 or 5 time zones crossed.

A good parameter to measure is how many regular office hours can you overlap with your offshore team. For example, if you are located in Miami or New York, and your work hours are from 8 AM to 5 PM, you will overlap the full 9 hours with an offshore team located in Buenos Aires during Daylight Saving Time (which is most of the year). That’s because Buenos Aires is only 1 hour ahead, there is no DST in Argentina and the regular office hours there are from 9 AM to 6 PM; so it’s a total match.

On the other hand, if you outsource to East Europe or India, you get almost zero overlapping.


4. Communication and Trust

How do you know people are actually working? That is done through trust and communication. You will never have a successful remote relationship if you fail to this one.

Either you are the contractor or the client, you have to be always available, respond quickly and anticipate to the other party needs. Answer your phone or your IM’s even if you are busy or, at least, let the other party know when you are normally available. The communication challenges of a remote relationship must be compensated with an always available policy.

In my company we schedule every day quick meetings over Hangouts  with clients and team members. We follow a typical Scrum stand up meeting format to answer three basic questions: what we are working on, what’s next and if there are any blocking issues. Apart from that, we communicate all the time through Hangouts IM or Skype. I expect clients and team members to be always available during known work hours.

If you don’t communicate at least every day, you lose momentum, the team member lowers the productivity and everyone lose interest and focus in the project.

Another important action you should take towards a better communication and trust building is to meet with your team in person. It makes a big difference to meet your remote workers at least once although I would recommend to do it regularly. Your team (or part of it) can travel for a week or two and work from your office. Use this opportunities to meet the people better but, above all, keep it professional.

Make it clear in advance what expenses you are covering and what not. You want to consider that even if you pay meals and lodging, travelling has other associated expenses.

Don’t try to be best friends with your freelancers. It’s OK if you want to hang out once or twice after work, but you don’t want it to go further than that. Keep it clean, keep it professional.

If you find it difficult for you to travel or have your team members travel to your location, make sure you make video conferences at least monthly to see each other faces.

Speaking about trust, this is straight and simple. If you don’t trust your remote worker, change it. A remote relationship is based mainly in trust. Specially when your developers are billing you by the hour, you have to trust they are working. You can’t have doubts about this one.

On the other hand, if a remote developer tells the client he is working 8 hours a day when he is not, he’s just killing his business; he is shooting his own foot.


5. Price should not be the most important factor in the decision

Price is the main reason most companies start thinking of offshore outsourcing, but sometimes the cheapest is not always the better. Within all your candidates for offshore development, don’t just go for the cheapest; try to discover the most talented professionals out there.  You’ll be surprised how many skilled and experienced professionals are there waiting for you.


Conclusion

Hiring a remote worker can be painful. What I recommended here is based in 15 years of working with freelancers and remote developers and designers and even working myself as a remote developer for many companies around the globe. I’ve heard these tips many times during that period but they are hard to assimilate unless you experience them.